Is your PS3 not recognizing a FAT32-formatted USB drive? Learn how to fix this common issue using Rufus with our step-by-step guide for a quick and effective solution.
If you’re struggling to get your PlayStation 3 to recognize your FAT32 USB drive, you’re not alone. This is a common issue, especially if you’re using custom firmware on your PS3 or trying to run emulators like RetroArch. Even though you may have formatted the drive to FAT32 using standard methods on Windows, the PS3 might still fail to detect it properly.
Fortunately, there’s a tried-and-true solution that many users have found effective: formatting the USB drive with Rufus. In this guide, we’ll walk you through the exact steps to ensure your PS3 can read your FAT32 USB without any issues.
What is Rufus and Why Should You Use It?
Rufus is a free, lightweight utility for formatting and creating bootable USB drives. While it’s widely used to create installation media for operating systems, Rufus is also perfect for preparing USB drives for devices that require specific configurations, such as the PS3.
What sets Rufus apart from other formatting tools is its ability to configure advanced settings like partition schemes and file systems, which are crucial for ensuring compatibility with older systems or devices with custom firmware. Additionally, Rufus can be run as a portable application, meaning you don’t need to install it on your computer to use it, making it even more convenient.
How to Properly Format a USB for PS3 with Rufus
Follow these steps to ensure your USB drive is correctly formatted for use with your PS3:
1. Download Rufus:
- Visit the Rufus official website and download the latest version. Opt for the portable version if you don’t want to install the software on your PC.
2. Insert Your USB Drive:
- Plug the USB drive you want to format into your computer. Important: Make sure to back up any important data, as the formatting process will erase everything on the drive.
3. Configure Rufus:
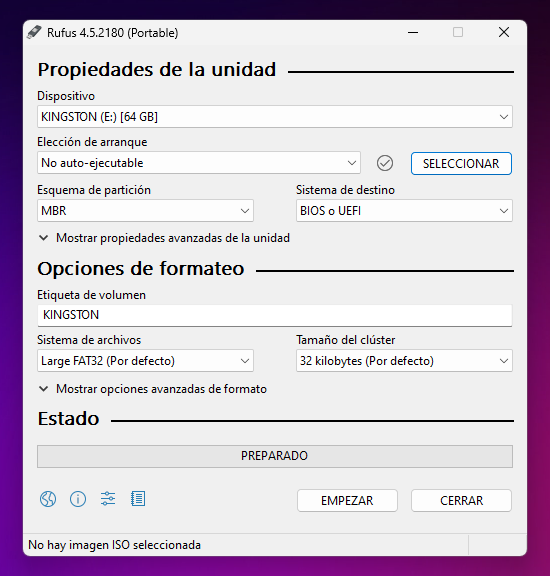
- Open Rufus and select your USB drive under the “Device” option. Ensure the correct drive is chosen if you have multiple connected.
- Boot Selection: Choose “Non-bootable” from the dropdown menu.
- Partition Scheme: Select “MBR” (Master Boot Record), which is the format compatible with the PS3.
- File System: From the dropdown, choose “Large FAT32”. This file system is critical for the PS3 to recognize the drive.
- Cluster Size: Leave it at the default setting of «32 kilobytes».
- Volume Label: You can assign a name to your USB drive, but this is optional.
4. Start Formatting:
- Once you’ve verified all settings, click “Start” to begin the formatting process. It will take a few minutes, and Rufus will notify you when the process is complete.
Conclusion:
After following these steps, I was finally able to use my USB drive on a PS3 running custom firmware. The console recognized the files without any issues, and RetroArch also detected the USB, allowing me to enjoy retro gaming smoothly. If you’re facing the same problem with your PS3 not recognizing a FAT32 USB drive, using Rufus to reformat it is the best solution.
FAQ
Why is my PS3 not recognizing my FAT32 USB drive?
The PS3 may not recognize your FAT32 USB drive if it’s not properly formatted. Even if you used Windows to format the drive to FAT32, certain configuration settings like the partition scheme or cluster size might not be compatible with the PS3. Using a tool like Rufus ensures that the drive is formatted correctly for use with the console.
How do I fix my PS3 not recognizing a FAT32 USB drive?
To fix this issue, you need to ensure the USB drive is properly formatted. Using Rufus is one of the easiest ways to format your drive with the correct settings: FAT32 file system, MBR partition scheme, and a 32KB cluster size. Following this method should allow your PS3 to recognize the USB drive without issues.
What file system should I use for a PS3 USB drive?
The PS3 requires USB drives to be formatted in FAT32. However, simply formatting the drive in FAT32 using traditional methods may not always work. It’s recommended to use Rufus to ensure the correct settings, including partition scheme (MBR) and cluster size (32KB), are applied for full compatibility.

